引言
这一节学习了,Django开发中的基础元素:models, admin, views, templates, 和 urls
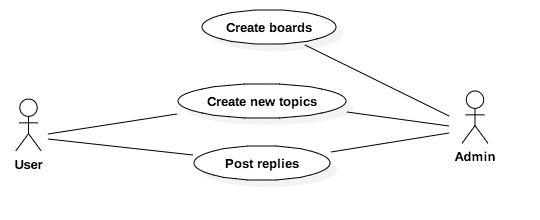
用例图
类图
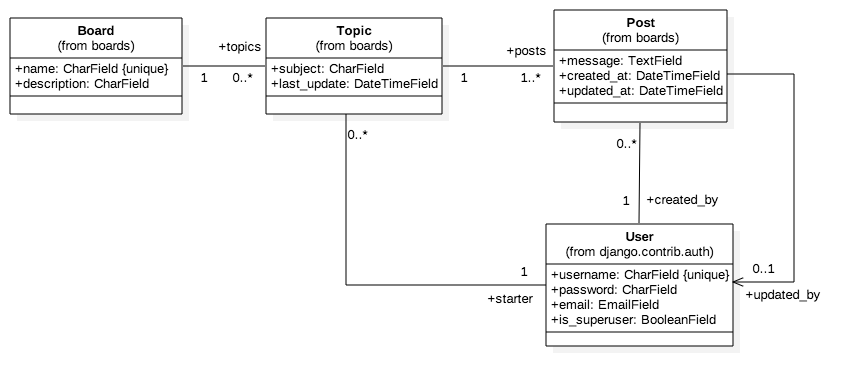
- 论坛需要4个模型,其中 Board, Topic, Post 是新建的模型,User 是Django系统的用户权限管理模块中的一个模型。
- Board 是论坛的板块,Topic 是每个板块(Board)下的主题,一个 Board 可以有多个 Topic,所以
topics 就是 0..* 。 - Post 是主题(Topic)下的帖子, 每个 Topic 至少有1个 Post,所以
posts 就是 1..* 。 - 每个 Topic 由一个用户(User)创建,同一个 User 可以创建多个 Topic ,一个 Topic 只能被一个 User 创建,所以
starter 就是 0..* 。 - 每个 Post 由一个用户(User)创建,同一个 User 可以创建多个 Post ,一个 Post 只能被一个 User 创建,所以
created_by 就是 1 。 - 每个用户(User)只能更新自己创建的 Post ,所以
updated_by 只能是 0..1。
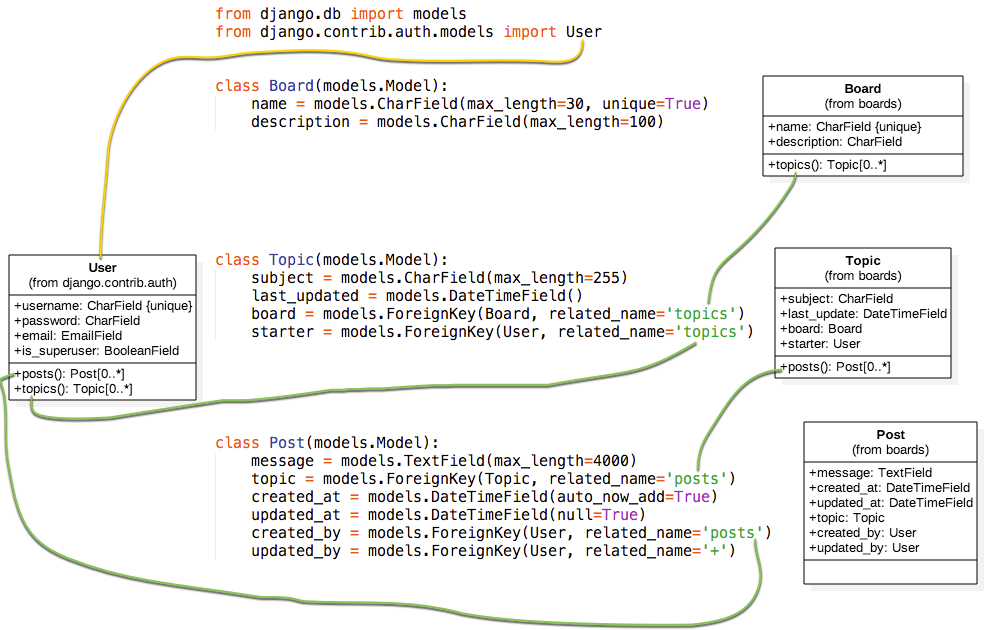
Model类
 1
 2
 3
 4
 5
 6
 7
 8
 9
10
11
12
13
14
15
16
17
18
19
20
21
22
23
24
25
26
27
|
# models.py
from django.db import models
from django.contrib.auth.models import User


class Board(models.Model):
    name = models.CharField(max_length=30, unique=True) # unique=True 表示唯一字段值不能重复
    description = models.CharField(max_length=100)


class Topic(models.Model):
    subject = models.CharField(max_length=255)
    last_updated = models.DateTimeField(auto_now_add=True) # auto_now_add=True 创建时自动填入当前时间
    # models.ForignKey Django 1.*版本 on_delete 默认为 models.CASECADE 所以不用添加;
    #                  Django 2.*版本以后必须明确指明。
    board = models.ForeignKey(Board, on_delete=models.CASCADE, related_name='topics')
    starter = models.ForeignKey(User, on_delete=models.CASCADE, related_name='topics')
    # related_name 为外键关联反向查询时使用的关键字,若不设置默认为 Model名_set
    # 例如:board.topics.all() 当设置了 related_name 时,查找某个 Board 下的所有 Topic
    #      board.topic_set.all() 没有设置 related_name 时,可以这样查找,效果同上

class Post(models.Model):
    message = models.TextField(max_length=4000)
    topic = models.ForeignKey(Topic, on_delete=models.CASCADE, related_name='posts')
    created_at = models.DateTimeField(auto_now_add=True)
    updated_at = models.DateTimeField(null=True)
    created_by = models.ForeignKey(User, on_delete=models.CASCADE, related_name='posts'
|
借用原作者的一张图说明情况
ORM自动生成数据库
 1
 2
 3
 4
 5
 6
 7
 8
 9
10
11
12
13
14
15
16
|
$ python manage.py makemigrations  # 生成数据库迁移文件
Migrations for 'boards':
  boards/migrations/0001_initial.py
    - Create model Board
    - Create model Topic
    - Create model Post

$ python manage.py migrate   # 执行迁移
Operations to perform:
  Apply all migrations: admin, auth, boards, contenttypes, sessions
Running migrations:
  Applying admin.0003_logentry_add_action_flag_choices... OK
  Applying auth.0009_alter_user_last_name_max_length... OK
  Applying auth.0010_alter_group_name_max_length... OK
  Applying auth.0011_update_proxy_permissions... OK
  Applying boards.0001_initial... OK
|
使用 Models API
- 进入据用当前项目环境变量的
python 交互环境
1
|
$ python manage.py shell
|
1
2
3
4
5
|
Python 3.7.2 (default, Feb 12 2019, 08:15:36)
[Clang 10.0.0 (clang-1000.11.45.5)] on darwin
Type "help", "copyright", "credits" or "license" for more information.
(InteractiveConsole)
>>>
|
1
|
>>> from boards.models import Board
|
1
|
>>> board = Board(name='Django', description='This is a board about Django.')
|
board 对象保存到数据库后,数据库会自动生成 id 主键,当调用 board.id 时,可以获得该主键。
注:当对象没有 save() 时,不能获取 id 。
1
2
|
>>> board.name
'Django'
|
1
2
|
>>> board.description
'This is a board about Django.'
|
1
2
|
>>> board.description = 'Django discussion board.'
>>> board.save()
|
每个 Django model 类都有一个特殊的属性,我们叫它 模型管理器(Model Manager),你可以通过 model 对象的 objects 属性访问它,它主要用于对象在数据库中的查询操作。例如,我们可以直接用它创建对象:
1
|
>>> board = Board.objects.create(name='Python', description='General discussion about Python.') # 直接创建,并没有使用save()方法保存
|
1
2
|
>>> board.name
'Python'
|
现在我们有2条 Board 记录,我们可以使用 objects 列出所有数据库中存在的 boards
1
2
|
>>> Board.objects.all()
<QuerySet [<Board: Board object>, <Board: Board object>]>
|
结果是一个 QuerySet 对象,之后会详细了解这个对象。我们能看出 QuerySet 对象中包含着 2 个 Board object ,但是看不出对象中的内容。当打印一个对象时,会调用这个对象的 __str__ 方法,我们只要定义了这个方法,并将有用的信息的从方法返回,当打印对象时,就会输出 __str__ 方法返回的内容。
编辑 board app 下的 models.py 文件:
1
2
3
4
5
6
|
class Board(models.Model):
name = models.CharField(max_length=30, unique=True)
description = models.CharField(max_length=100)
def __str__(self):
return self.name
|
这时,再执行以上语句:
1
2
|
>>> Board.objects.all()
<QuerySet [<Board: Django>, <Board: Python>]>
|
这样好多了。
我们可以像使用 list 一样使用 QuerySet。 QuerySet 是可迭代的:
1
2
3
4
5
6
|
>>> board_list = Board.objects.all()
>>> for board in board_list:
... print(board.description)
Django discussion board.
General discussion about Python.
|
可以使用 Manager 的 get 方法从数据库获得一条对象记录:
1
2
3
|
>>> board = Board.objects.get(id=1)
>>> board.name
'Django'
|
get 函数可以使用 model 中的任何属性字段做条件,但 get 方法只允许返回一条对象记录,所以最好选择能够唯一标识 model 对象的属性字段做条件,否则如果通过条件找到多个符合条件的对象时会报错: boards.models.Board.MultipleObjectsReturned: ... ,当找不到符合条件的记录时,即对象不存在时也会报错:boards.models.Board.DoesNotExist:...
Model的操作总结
| 操作 | 代码 |
| 新建一个对象(不保存数据库) | board = Board() |
| 保存一个对象到数据库(create or update) | board.save() |
| 一次创建并保存对象 | Board.objects.create(name=’…’, description=’…') |
| List all objects | Board.objects.all() |
| 通过一个唯一标识获取一条对象记录 | Board.objects.get(id=1) |
Views, Templates, and Static Files
我们之前已经有了一个视图,它是由 url 和 view 两部分组成的
1
2
3
4
5
6
7
8
9
|
from django.urls import path, re_path
from django.contrib import admin
from boards import views
urlpatterns = [
path('', views.home, name='home'), # url 指定我们访问 http://host:port/ 时,访问这个view
path('admin/', admin.site.urls),
]
|
1
2
3
4
|
from django.http import HttpResponse
def home(request):
return HttpResponse("Hello, World!!!")
|
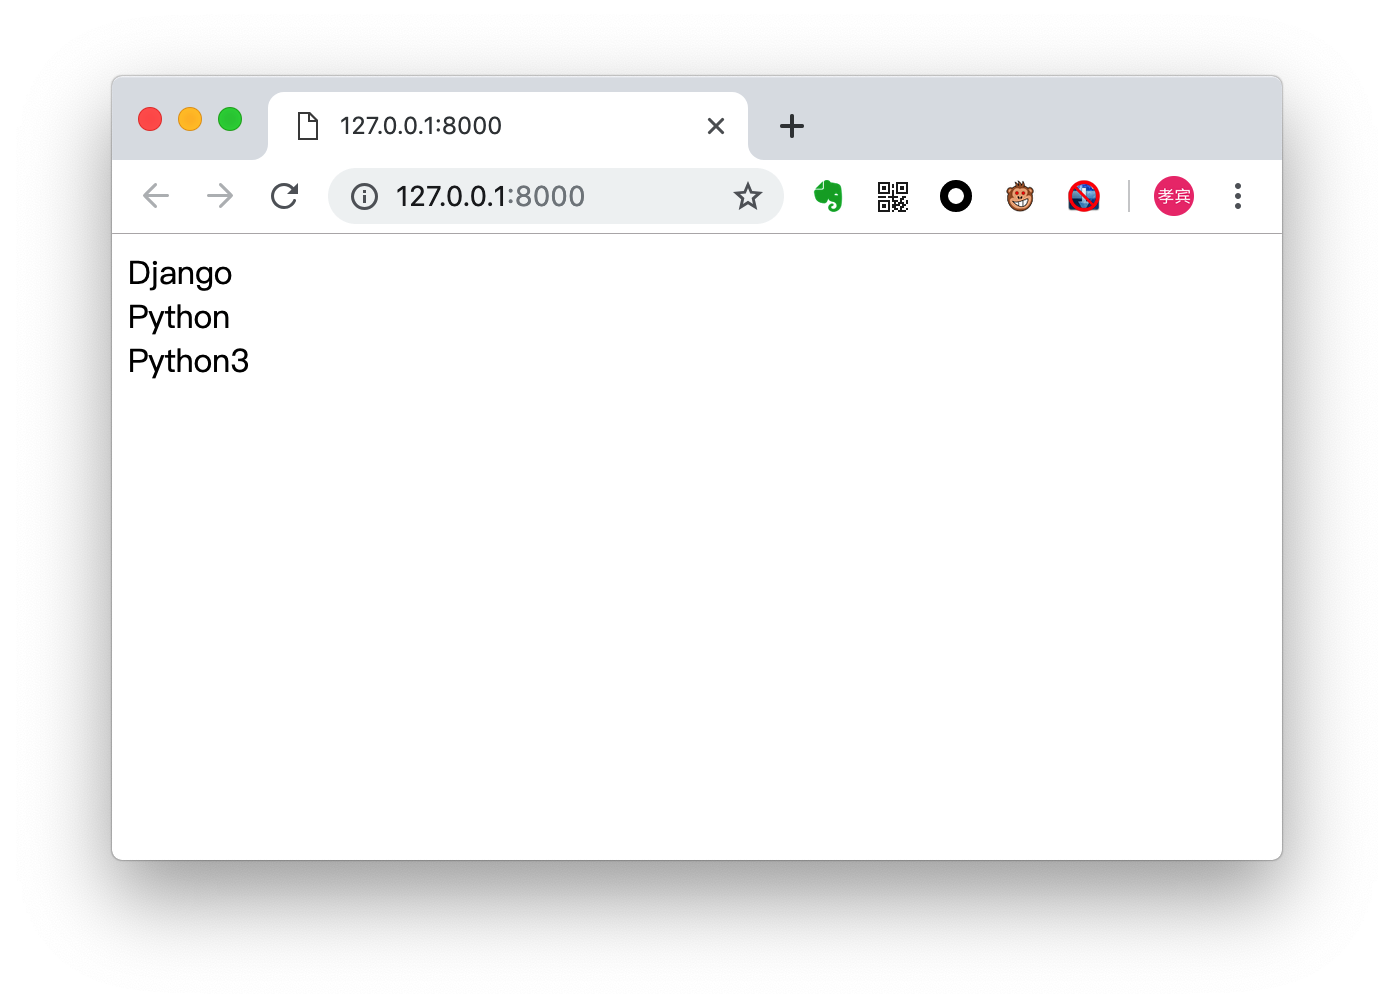
现在,我们基于此,修改 views.py 在首页上显示 Board 对象的列表
1
2
3
4
5
6
7
8
9
10
11
12
13
14
|
from django.http import HttpResponse
from boards.models import Board
def home(request):
boards = Board.objects.all()
boards_names = list()
for board in boards:
boards_names.append(board.name)
response_html = '<br>'.join(boards_names)
return HttpResponse(response_html)
|
访问首页如图:
Templates设置
在项目的根目录新建 templates 文件夹
1
2
3
4
5
6
7
|
myproject/
|-- myproject/
| |-- boards/
| |-- myproject/
| |-- templates/ <-- here!
| +-- manage.py
+-- venv/
|
在 templates 目录中新建一个 home.html 文件
1
2
3
4
5
6
7
8
9
10
11
12
13
14
15
|
<!DOCTYPE html>
<html>
<head>
<meta charset="utf-8">
<title>Boards</title>
</head>
<body>
<h1>Boards</h1>
{% for board in boards %}
{{ board.name }} <br>
{% endfor %}
</body>
</html>
|
我们将一些特殊的标签和 html 标签混合在一起, 如: {% for .. in .. %} {{ variable }}, 这些都是 Django 的模板语言。以上的例子使用 for 标签将数据迭代,使用 {{ board.name }} 显示每一个 Board 对象的 name 属性。
在 myproject 中找到 settings.py 文件,修改文件中以下内容:
1
2
3
4
5
6
7
8
9
10
11
12
13
14
15
16
17
18
|
TEMPLATES = [
{
'BACKEND': 'django.template.backends.django.DjangoTemplates',
'DIRS': [
# 将项目根目录下的templates文件夹设置为TEMPLATES的一个搜索目录
os.path.join(BASE_DIR, 'templates')
],
'APP_DIRS': True,
'OPTIONS': {
'context_processors': [
'django.template.context_processors.debug',
'django.template.context_processors.request',
'django.contrib.auth.context_processors.auth',
'django.contrib.messages.context_processors.messages',
],
},
},
]
|
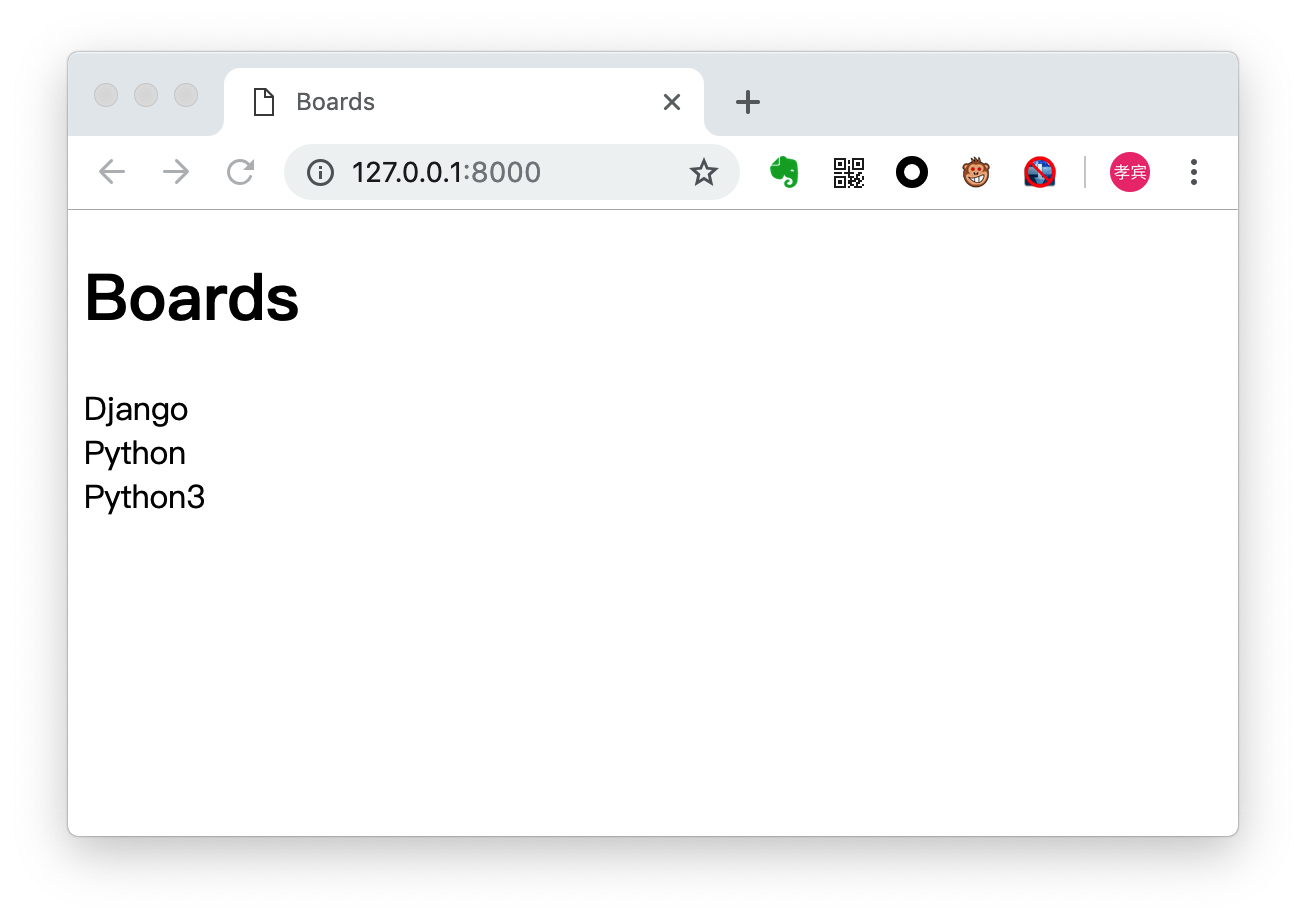
修改 boards/views.py 文件,在 home 函数中使用 home.html 模板
1
2
3
4
5
6
7
|
from django.shortcuts import render
from boards.models import Board
def home(request):
boards = Board.objects.all()
return render(request, 'home.html', {'boards': boards})
|
访问首页如图:
在 home.html 模板中使用表格从新格式化数据
1
2
3
4
5
6
7
8
9
10
11
12
13
14
15
16
17
18
19
20
21
22
23
24
25
26
27
28
29
30
31
32
33
34
|
<!DOCTYPE html>
<html>
<head>
<meta charset="utf-8">
<title>Boards</title>
</head>
<body>
<h1>Boards</h1>
<table border="1">
<thead>
<tr>
<th>Board</th>
<th>Posts</th>
<th>Topics</th>
<th>Last Post</th>
</tr>
</thead>
<tbody>
{% for board in boards %}
<tr>
<td>
{{ board.name }}<br>
<small style="color: #888">{{ board.description }}</small>
</td>
<td>0</td>
<td>0</td>
<td></td>
</tr>
{% endfor %}
</tbody>
</table>
</body>
</html>
|
访问首页如图:
测试首页
在 boards/tests.py 中写我们的第一个测试
1
2
3
4
5
6
7
8
9
10
|
# Django 1.* 中 reverse 的位置
# from django.core.urlresolvers import reverse
from django.urls import reverse
from django.test import TestCase
class HomeTests(TestCase):
def test_home_view_status_code(self):
url = reverse('home')
response = self.client.get(url)
self.assertEquals(response.status_code, 200)
|
这是一个非常简单的测试例子,我们建议响应状态码,如果为 200 表示首页访问成功。
执行 Django 测试
1
2
3
4
5
6
7
8
9
10
|
$ python manage.py test
Creating test database for alias 'default'...
System check identified no issues (0 silenced).
.
----------------------------------------------------------------------
Ran 1 test in 0.046s
OK
Destroying test database for alias 'default'...
(myproject) (base)
|
接下来,我们测试 url 匹配,当访问网站根目录时,是否访问的是 boards/views.py 中的 home 函数
1
2
3
4
5
6
7
8
9
10
11
12
13
|
from django.urls import reverse, resolve
from django.test import TestCase
from .views import home
class HomeTests(TestCase):
def test_home_view_status_code(self):
url = reverse('home')
response = self.client.get(url)
self.assertEquals(response.status_code, 200)
def test_home_url_resolves_home_view(self):
view = resolve('/')
self.assertEquals(view.func, home)
|
上面的测试使用 resolve 函数反向解析 url ,在 Django 中可以根据路径反向找到对应的处理函数。
在此执行测试
1
2
3
4
5
6
7
8
9
|
$ python manage.py test
Creating test database for alias 'default'...
System check identified no issues (0 silenced).
..
----------------------------------------------------------------------
Ran 2 tests in 0.015s
OK
Destroying test database for alias 'default'...
|
如果想看到测试的更多信息,可以设置 --verbosity 参数
 1
 2
 3
 4
 5
 6
 7
 8
 9
10
11
12
13
14
15
16
17
18
19
20
21
22
23
24
25
26
27
28
29
30
31
32
33
34
35
36
|
$ python manage.py test --verbosity=2
Creating test database for alias 'default' ('file:memorydb_default?mode=memory&cache=shared')...
Operations to perform:
Synchronize unmigrated apps: messages, staticfiles
Apply all migrations: admin, auth, boards, contenttypes, sessions
Synchronizing apps without migrations:
Creating tables...
Running deferred SQL...
Running migrations:
Applying contenttypes.0001_initial... OK
Applying auth.0001_initial... OK
Applying admin.0001_initial... OK
Applying admin.0002_logentry_remove_auto_add... OK
Applying admin.0003_logentry_add_action_flag_choices... OK
Applying contenttypes.0002_remove_content_type_name... OK
Applying auth.0002_alter_permission_name_max_length... OK
Applying auth.0003_alter_user_email_max_length... OK
Applying auth.0004_alter_user_username_opts... OK
Applying auth.0005_alter_user_last_login_null... OK
Applying auth.0006_require_contenttypes_0002... OK
Applying auth.0007_alter_validators_add_error_messages... OK
Applying auth.0008_alter_user_username_max_length... OK
Applying auth.0009_alter_user_last_name_max_length... OK
Applying auth.0010_alter_group_name_max_length... OK
Applying auth.0011_update_proxy_permissions... OK
Applying boards.0001_initial... OK
Applying sessions.0001_initial... OK
System check identified no issues (0 silenced).
test_home_url_resolves_home_view (boards.tests.HomeTests) ... ok
test_home_view_status_code (boards.tests.HomeTests) ... ok
----------------------------------------------------------------------
Ran 2 tests in 0.033s
OK
Destroying test database for alias 'default' ('file:memorydb_default?mode=memory&cache=shared')...
|
--verbosity 参数: 0 表示无输出,1 表示正常输出, 2 表示详细输出
Static Files设置
静态文件包括CSS, JavaScripts, Fonts, Images和一些其它的网站使用的资源文件。
生产环境中 Django 是不提供静态资源服务的,我们应该使用 Nginx 等服务器去提供静态资源访问服务,但在开发模式下,Django 提供一个效率不高的静态资源服,这样便于我们开发。Django 还提供一些功能来方便我们管理静态资源,这些功能在 django.contrib.staticfiles app 中,在 settings.py 文件中的 INSTALLED_APPS 中已经默认配置了该 app。
前端我们使用开源的 Bootstrap 4 作为前端组件。
我们在项目跟目录创建 static 目录, 并在该目录下新建 css 目录
1
2
3
4
5
6
7
8
9
|
myproject/
|-- myproject/
| |-- boards/
| |-- myproject/
| |-- templates/
| |-- static/ <-- here
| | +-- css/ <-- and here
| +-- manage.py
+-- venv/
|
访问 getbootstrap.com 下载最新的编译版本的CSS和JS(Compiled CSS and JS),并解压将其中的 bootstrap.min.css 放入 css 目录
1
2
3
4
5
6
7
8
9
10
|
myproject/
|-- myproject/
| |-- boards/
| |-- myproject/
| |-- templates/
| |-- static/
| | +-- css/
| | +-- bootstrap.min.css <-- here
| +-- manage.py
+-- venv/
|
在 settings.py 文件中, 在 STATIC_URL 之后添加 STATICFILES_DIRS
1
2
3
4
5
|
STATIC_URL = '/static/'
STATICFILES_DIRS = [
os.path.join(BASE_DIR, 'static'),
]
|
在模板中引入 Bootstrap 样式
1
2
3
4
5
6
7
8
9
10
11
12
|
{% load static %}
<!DOCTYPE html>
<html>
<head>
<meta charset="utf-8">
<title>Boards</title>
<link rel="stylesheet" href="{% static 'css/bootstrap.min.css' %}">
</head>
<body>
<!-- body suppressed for brevity ... -->
</body>
</html>
|
首先在模板的最开头使用 {% load static %} 标签引入静态文件App,之后我们就可以在模板中使用 {% static %} 标签,在这个例子中 {% static 'css/bootstrap.min.css' %} 返回 /static/css/bootstrap.min.css,相当于 http://127.0.0.1:8000/static/css/bootstrap.min.css。
{% static %} 标签使用了 settings.py 文件中 STATIC_URL 的配置来组成最终的静态文件 URL 。例如:如果 STATIC_URL=http://static.example.com/,那么 {% static 'css/bootstrap.min.css' %} 返回 http://static.example.com/css/bootstrap.min.css。
此时首页已经有了一些默认样式的变化:
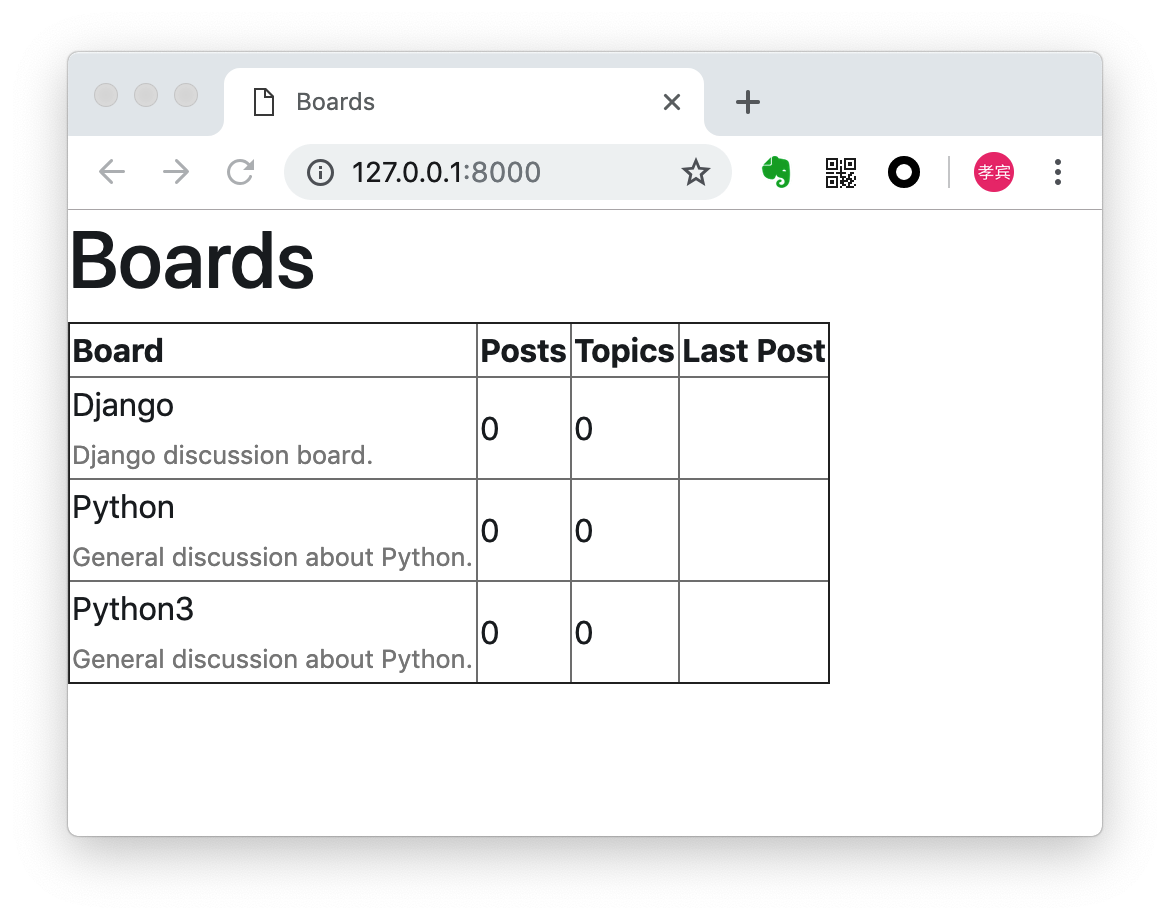
根据 Bootstrap 重新调整 home.html 模板
 1
 2
 3
 4
 5
 6
 7
 8
 9
10
11
12
13
14
15
16
17
18
19
20
21
22
23
24
25
26
27
28
29
30
31
32
33
34
35
36
37
38
39
|
{% load static %}
<!DOCTYPE html>
<html>
<head>
<meta charset="utf-8">
<title>Boards</title>
<link rel="stylesheet" href="{% static 'css/bootstrap.min.css' %}">
</head>
<body>
<div class="container">
<ol class="breadcrumb my-4">
<li class="breadcrumb-item active">Boards</li>
</ol>
<table class="table">
<thead class="thead-dark">
<tr>
<th>Board</th>
<th>Posts</th>
<th>Topics</th>
<th>Last Post</th>
</tr>
</thead>
<tbody>
{% for board in boards %}
<tr>
<td>
{{ board.name }}
<small class="text-muted d-block">{{ board.description }}</small>
</td>
<td class="align-middle">0</td>
<td class="align-middle">0</td>
<td></td>
</tr>
{% endfor %}
</tbody>
</table>
</div>
</body>
</html>
|
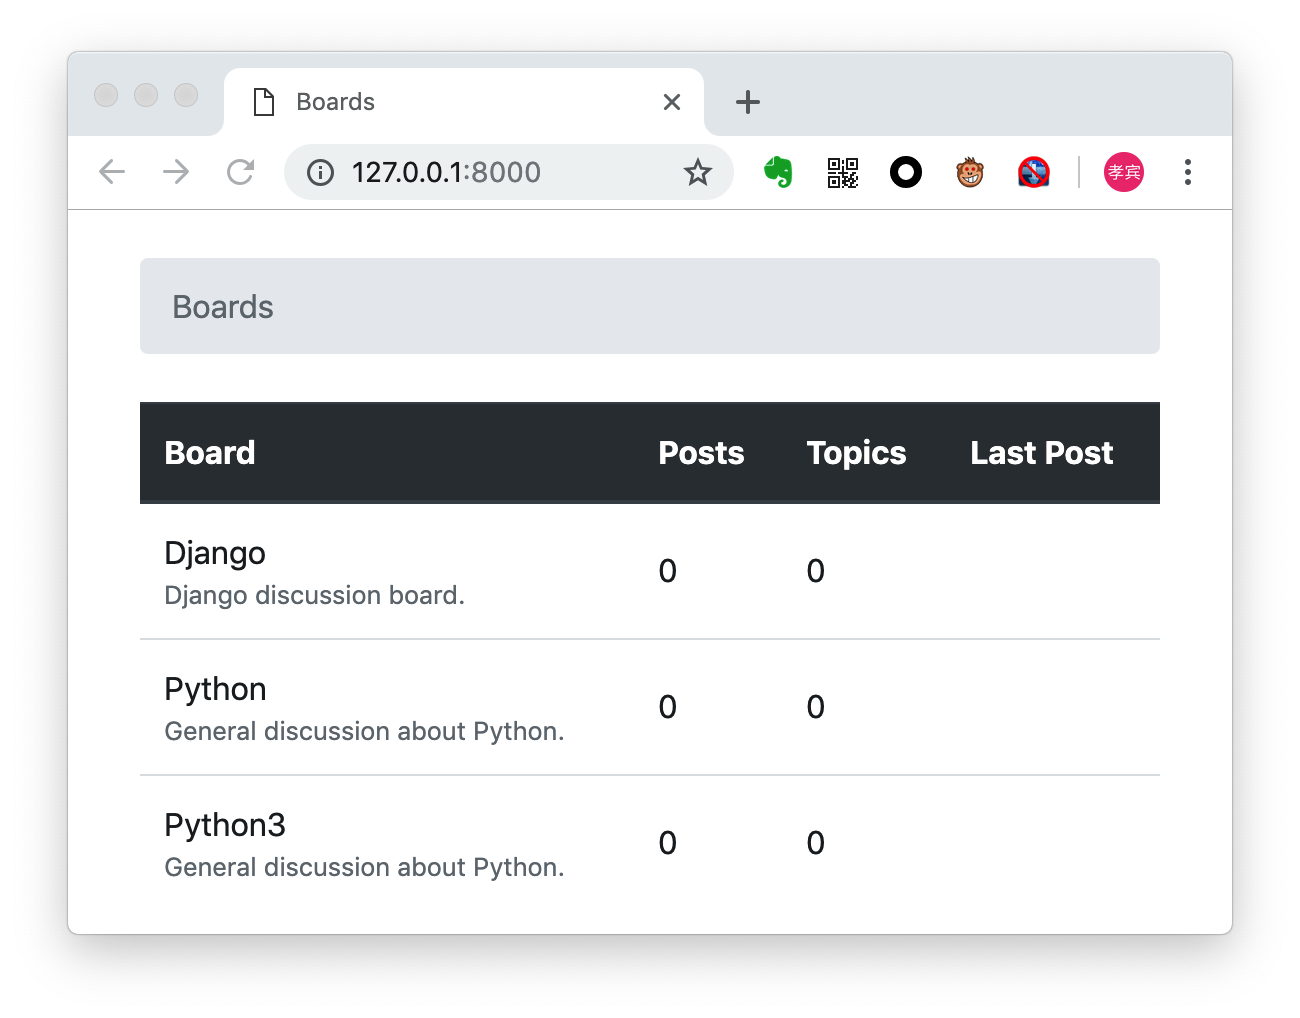
调整后结果
Django Admin简介
当开始一个新的Django项目时,配置文件包含一个 django.contrib.admin 配置在 INSTALLED_APPS 中。这个App为Django提供了一个管理后台可以很好的来管理数据表的数据。
现在,我们可以配置我们 Django 项目的 Django Admin 来管理我们的数据。
首先,创建一个超级用户
1
|
python manage.py createsuperuser
|
按照提示操作:
1
2
3
4
5
|
Username (leave blank to use 'codepanda'): admin
Email address: admin@example.com
Password:
Password (again):
Superuser created successfully.
|
现在使用浏览器访问:http://127.0.0.1:8000/admin/ 进入登录页面
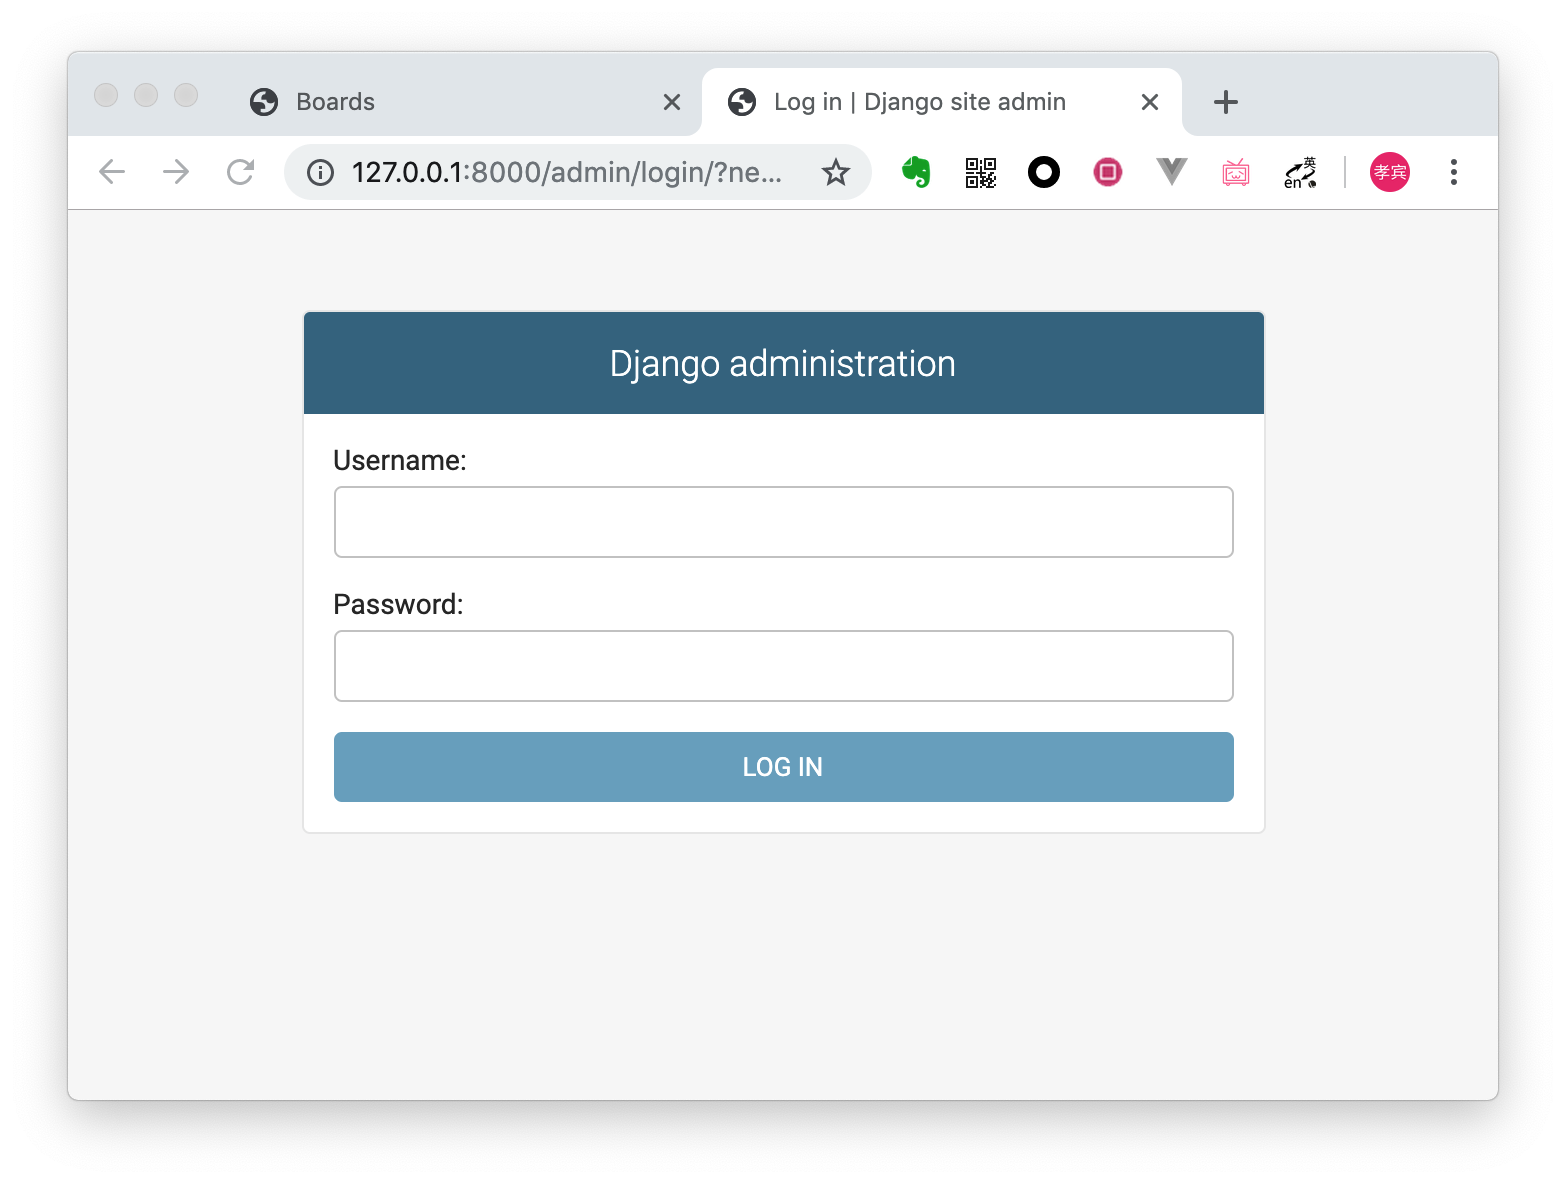
输入刚刚创建的超级用户的 username 和 password 登录
将我们自定义的 Board 模型加入到后台管理是非常简单的,只需要在 app boards 下
找到 admin.py 文件,加入如下代码:
boards/admin.py
1
2
3
4
|
from django.contrib import admin
from .models import Board

admin.site.register(Board)
|
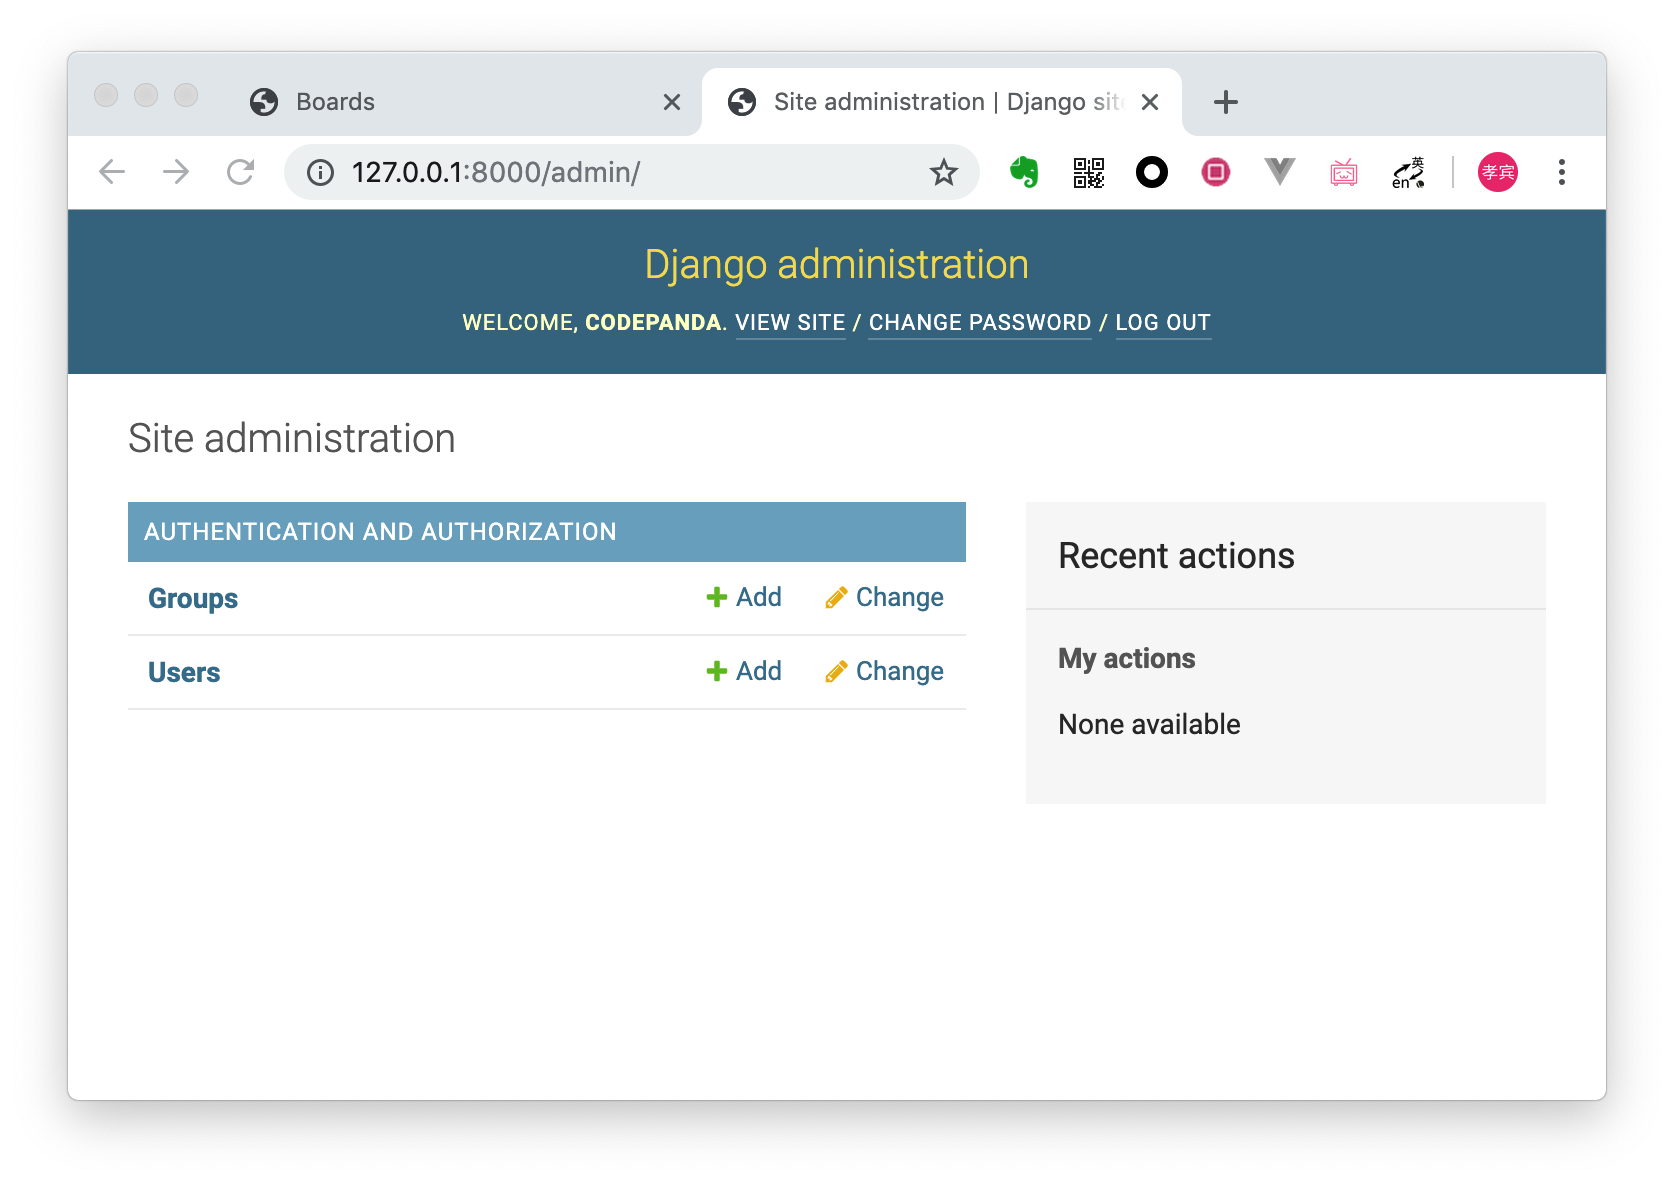
保存 admin.py 文件,并刷新后台页面:

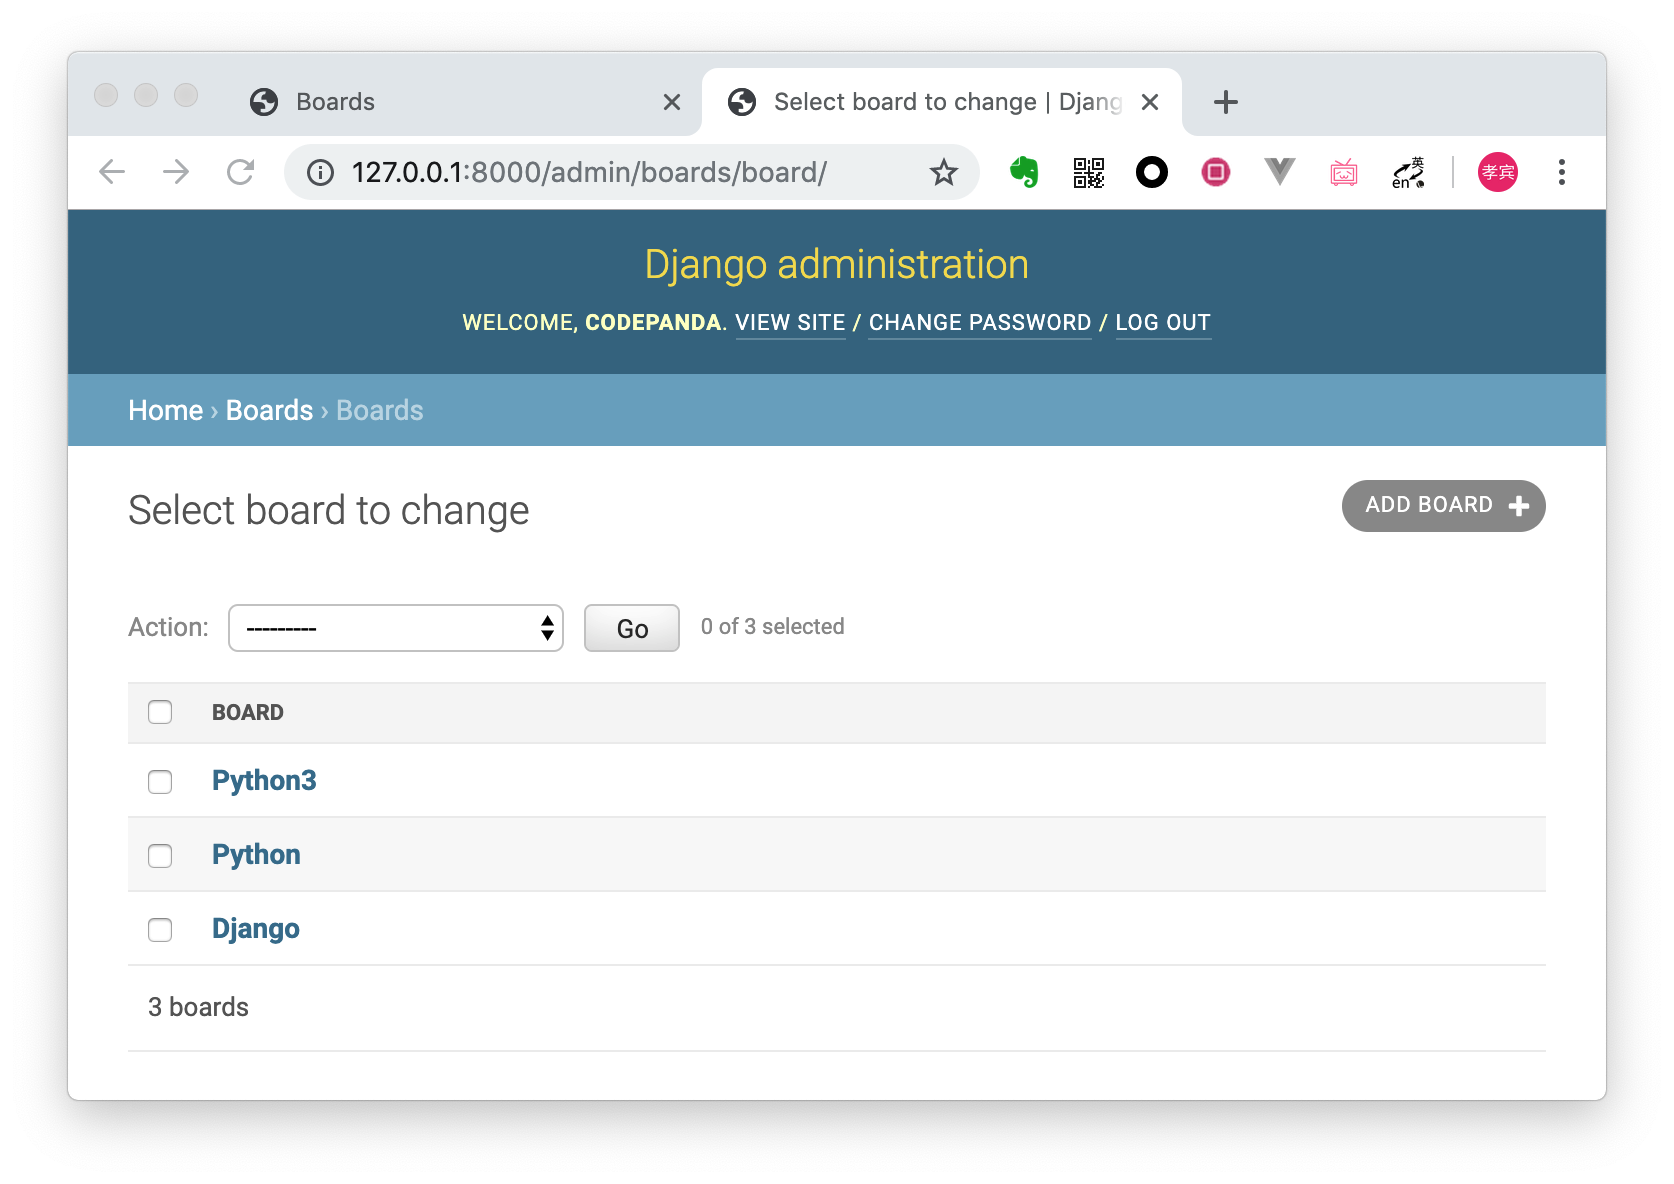
现在, Board 模型已经出现在后台管理了, 单击 Boards链接可以查看已存在的 boards 数据:
我们可以单击 ADD BOARD 按钮添加一个新的 board:
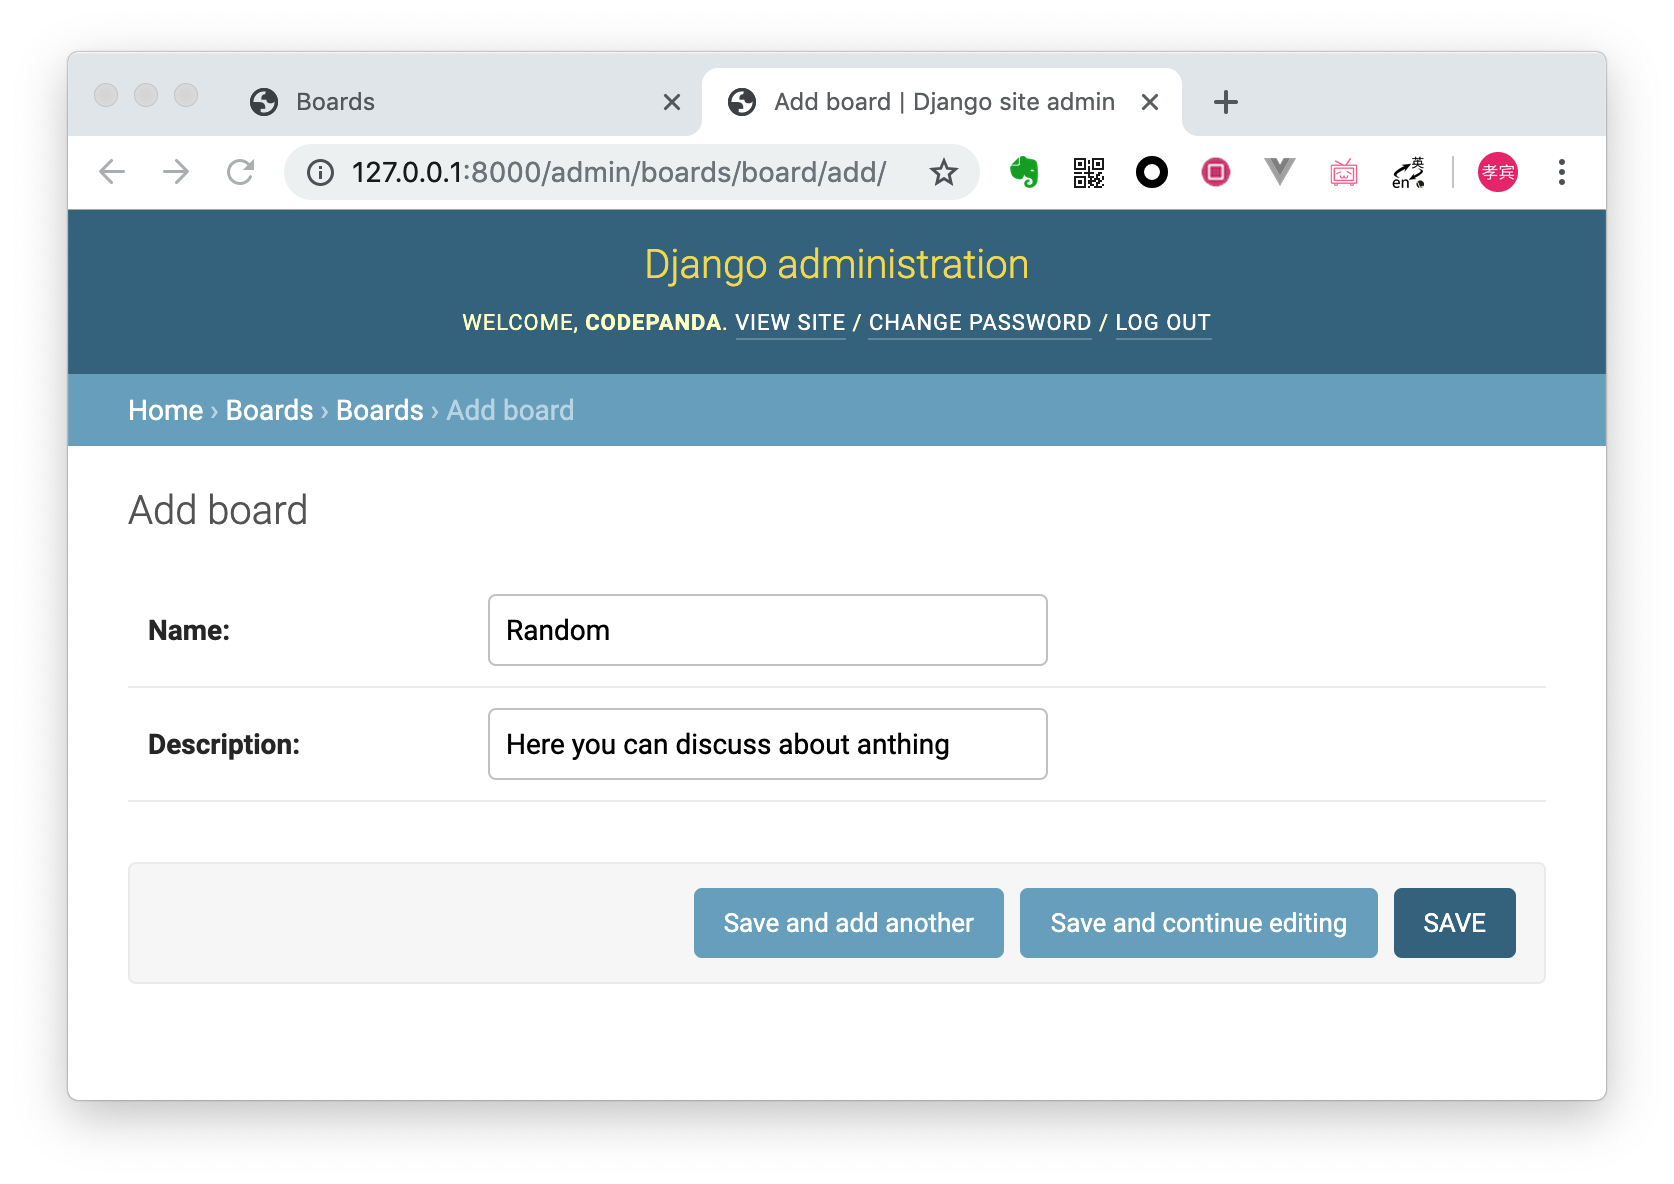
点击 save 按钮:
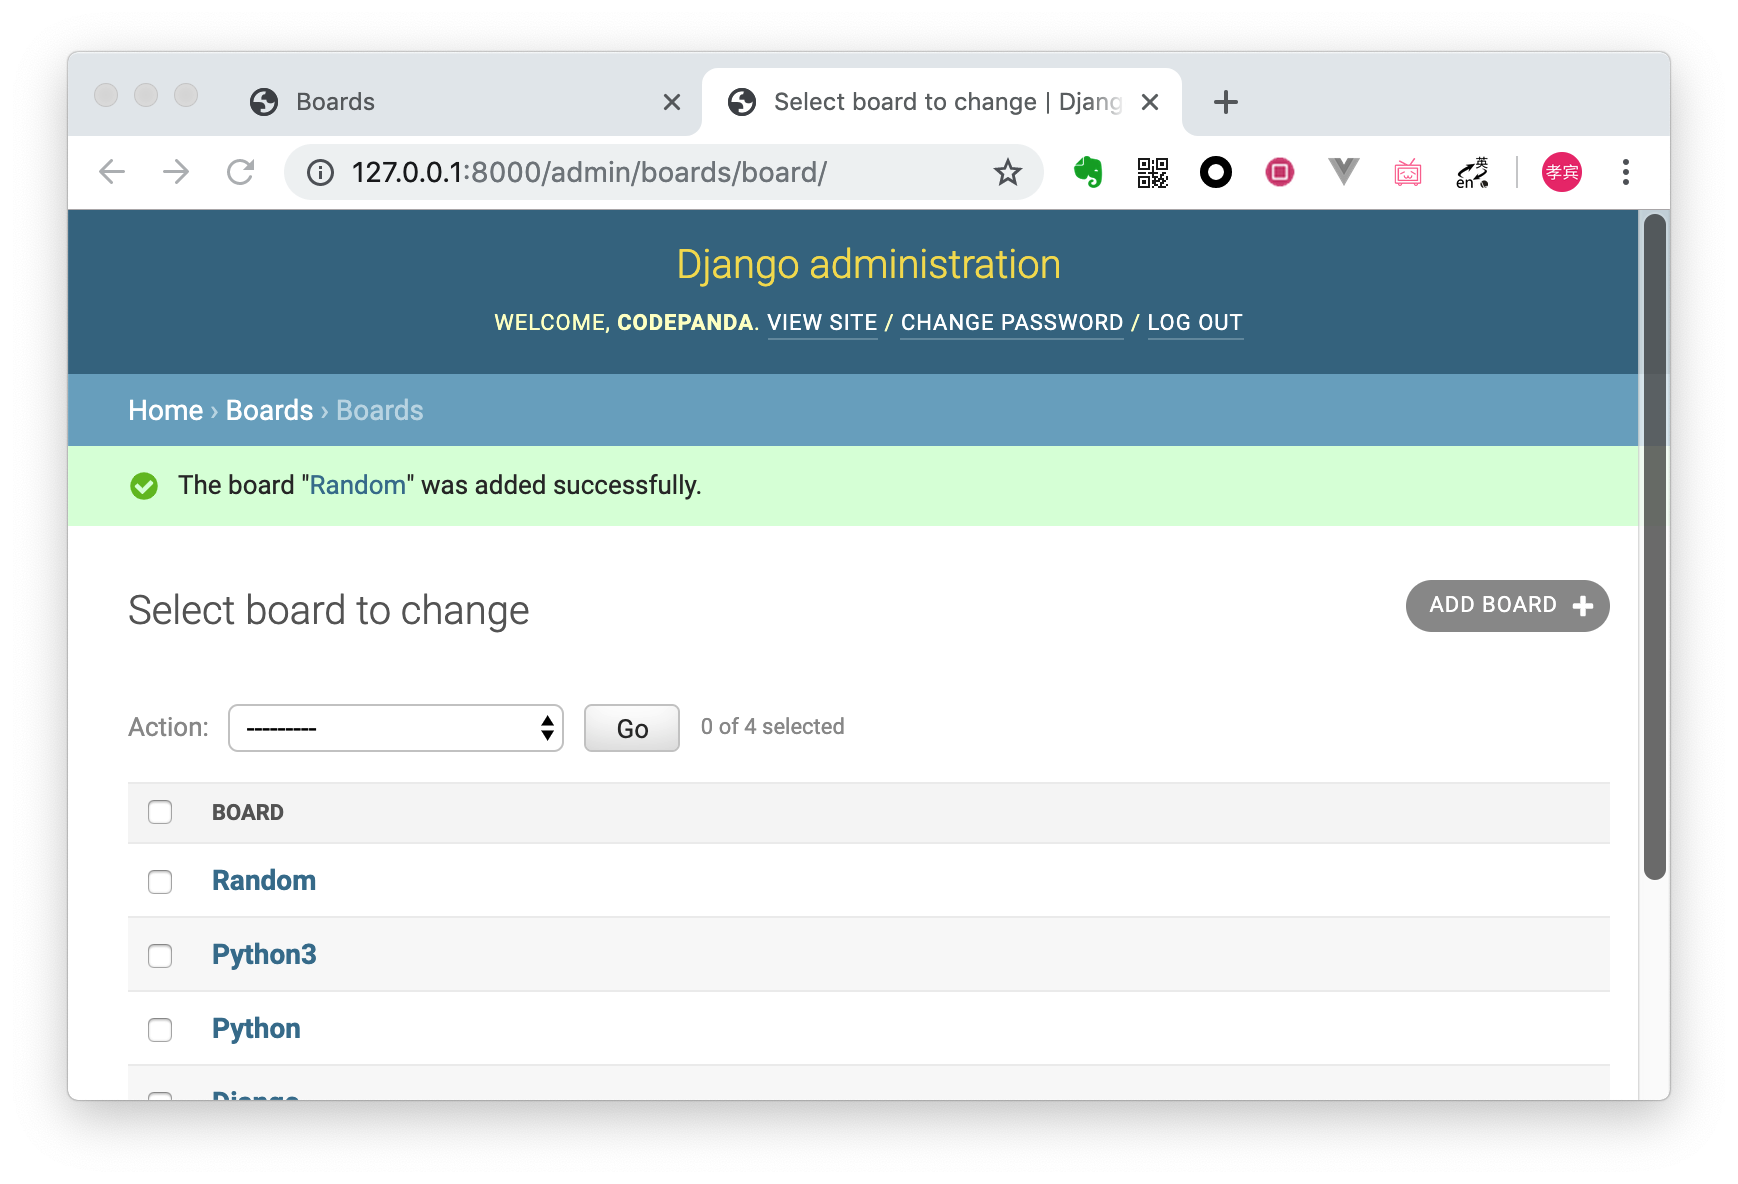
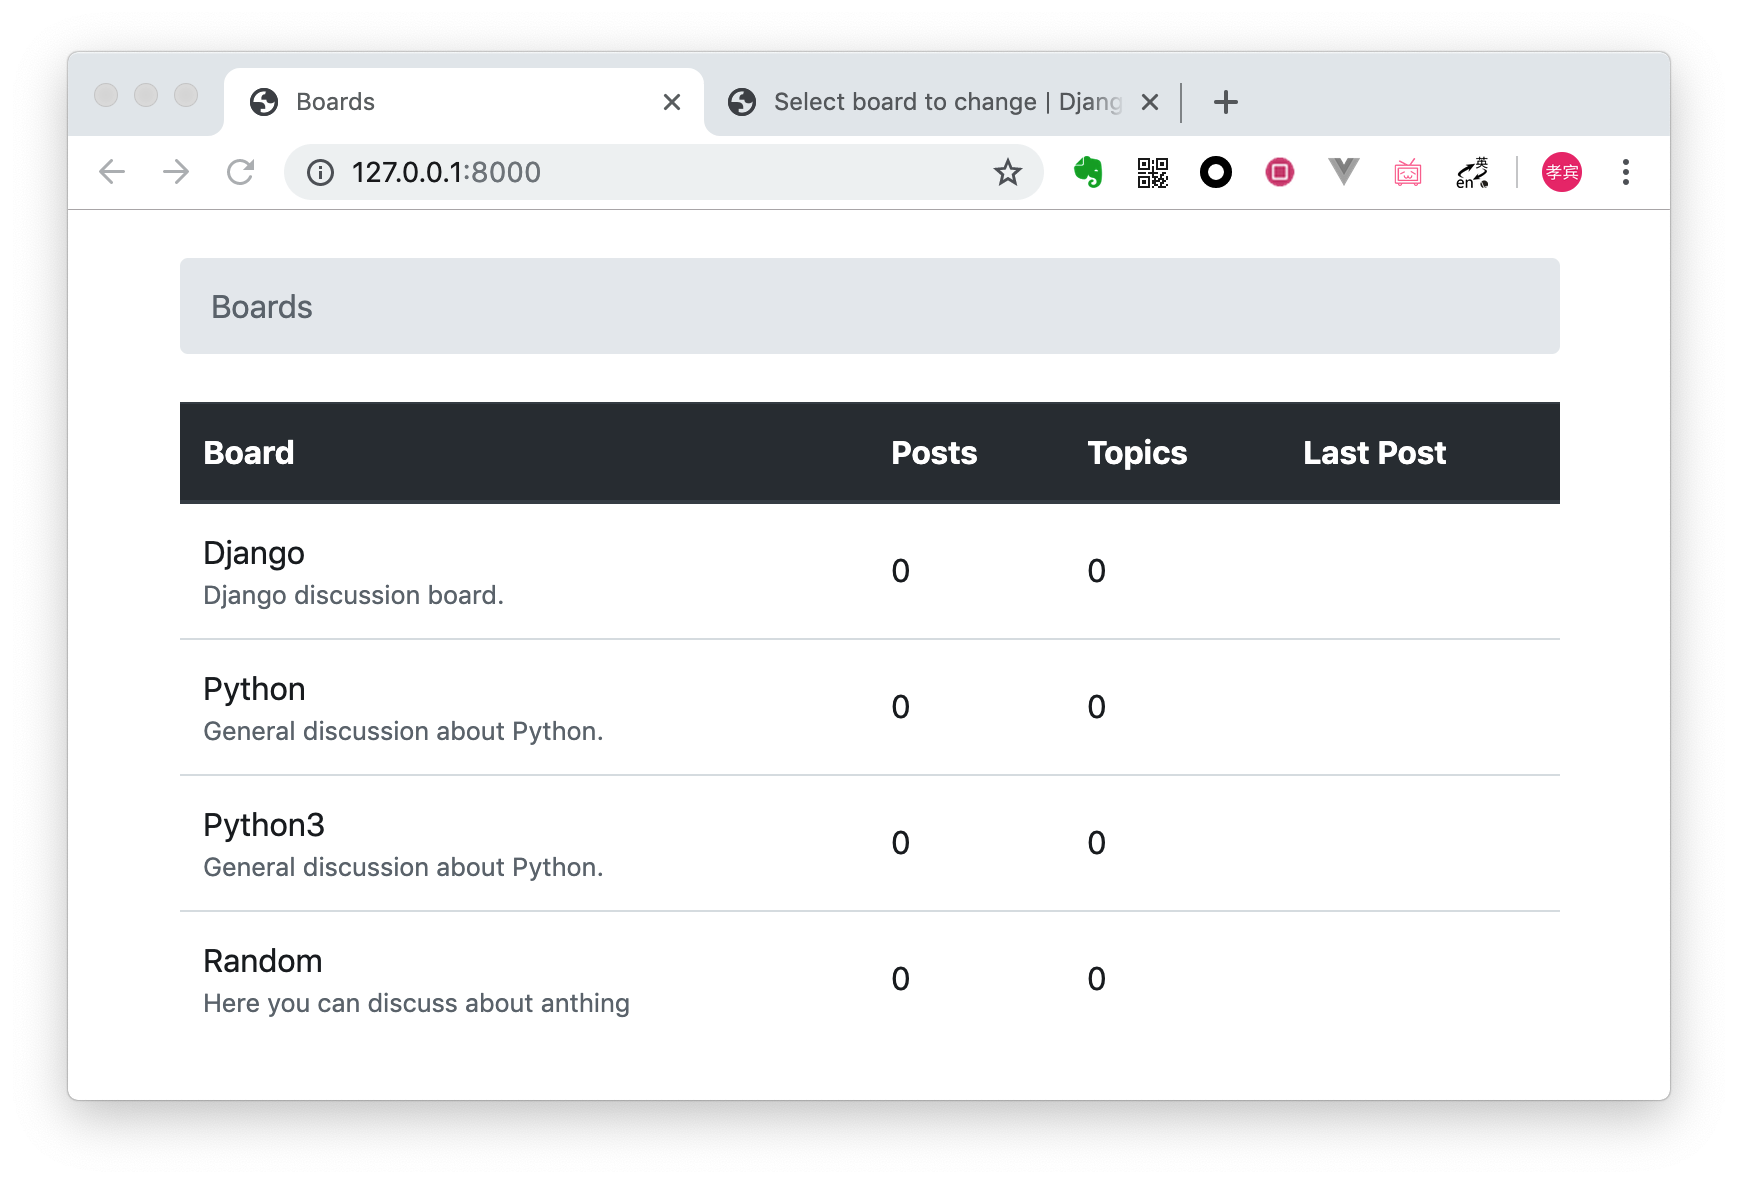
如果一切工作正常我们访问 http://127.0.0.1:8000 时,可以看到新添加的 board:
结论
在这一节里,我们创建了第一个 models 并迁移了数据库,使用了 Models API。 我们创建了第一个 View 、写了一些单元测试。 我们配置了模板引擎、静态文件、并加入了 Bootstrap 4 到我们的项目里,最后,我们简单的使用了 Django Admin 界面。